Showing posts with label DIY. Show all posts

Wednesday, December 23, 2015

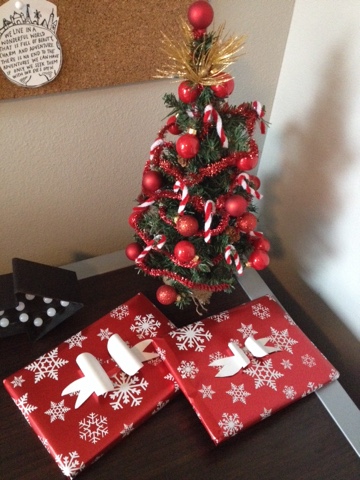
Wrapping Paper Bow DIY | Blogmas 2015

Hello lovely reader! Happy Christmas Eve Eve! I spent a good part of my day yesterday wrapping presents, from boxes to bags to a rum cake in an octagonal box (nailed it if I do say so myself), I was wrapping things of all shapes and sizes. I do actually enjoy this process that I know some dread. I like trying to think of creative ways to make the gifts look as enticing as possible (love a nice big bow). One little trick that I found online last year was this paper bow tutorial, which I have found to be extremely useful when you do not have any ribbon, or prefer the look of a nice fuller bow. It's also great if you are in a bit of a time crunch but need something to top off a gift. Super quick, super easy, and super cute.


I like to use the reverse side of whatever wrapping paper I've used on the gift but you can really use any paper you like.


Simply cut out these three shapes,


Fold and tape, 


Wrap around, 

and attack the two pieces!


Do you have any wrapping tricks? Xx

Saturday, July 4, 2015

Pineapple Print Canvas | DIY

Hiya lovely reader! It is a beautiful sunny day today and I am loving it! Now as many of you may know for some odd reason that I certainly do not understand, pineapples have become all the rage! Now I don't mean eating them, I mean in clothes, shoes, accessories, homeware, if you want something with a pineapple on it, you should have no problem finding it these days! They're EVERYWHERE! Personally, I don't understand the obsession but I do have a friend who has jumped on the spiky fruity bandwagon, and happens to have a birthday this month, which leads to the idea for the ultimate "pineapple print canvas DIY". Let's begin! 


You will need:
-a square canvas (size being up to you)
-acrylic paints (at least three colors, two for the background and one for the pineapple)
-sponge paint brushes
-a ruler
-painters tape
-a pineapple stencil (I found mine online, printed it on card stock, and cut it out to the size of the square sections on my canvas) 

The first thing that you are going to need to do is measure and divide the canvas into four even squares. 

Then, decide where you want to start and mark off your first square with painters tape. 

Next, take your first color choice and paint the square. (Depending on the color, you may want to allow the layer to dry and add more paint) I gave each of my background colors three coats. 

When you are sure that the square is COMPLETELY dry, take off the tape and mark the next square, repeating the steps above.

Once all the squares are dry, take your stencil and lay it on top. For this part, I highly recommend either taping the stencil down or having someone hold it down so that the stencil doesn't shift and create smudges. 

Once you have a steady stencil, dip a sponge in the paint color of your choice (I chose white) and begin to dap at the stencil. Be sure to dab in a vertical motion so that the paint does not sneak under the stencil. 

Repeat this a couple times, again, allow it to fully dry, BEFORE removing the stencil. 

Do this for each of squares. 

And there you have it, a perfect pineapple picture for anyone who's smitten with this funky trend!

What do you make of this pineapple craze? Xx

Monday, June 29, 2015

Sew Simple | Laptop Sleeve DIY

Hello lovely reader! As mentioned in previous posts, I wanted to give myself the challenge and goal of learning to sew this summer. After a couple projects, I am quite pleased with my creations and my abilities with a sewing machine. For this post I wanted to share something that I feel I have somewhat mastered after making two that turned out great. It is a zippered laptop sleeve.


Now when I first got my laptop I really wanted a cute case, but after looking around endlessly online I couldn't find what I was looking for, and gave up the hunt for a while. Last week though, I was on my current favorite blog called Merrick's Art looking for something else to try and make. While scrolling, I stumbled upon this super chic fold over clutch tutorial. I still may make the clutch but it got me thinking that I could probably make my own laptop sleeve. I did some searching and found a tutorial on a blog called Stitched by Crystal. Thus my laptop case making began.

So far I have made one for myself and one for my friend for her birthday. The first one took me about 45 minutes or so to make. However for the second one, once I knew what I was doing, I had the whole thing completed in about 30 minutes. So you will see that it is pretty easy to learn how to make this practical little item. Since I used Crystal's step by step I am going to link her post rather then take her material. (No pun intended) I will show you some pics of the steps for reference, as well as the finished product.


"STITCHED by Crystal: Tutorial: Zippered laptop sleeve"

If you give this a go, I would love to see what you create. Happy stitching! Xx

Sunday, December 14, 2014

Simple Decoration DIY | Blogmas

Hello lovely reader! I hope you had a nice weekend! Today I wanted to share a simple DIY with you based on a picture I saw in a magazine. 


You will need:
-a glass bowl
-fake snow
-small ornaments or sparkly bits


This DIY really is so simple, all you have to do is fill the bowl about 2/3 of the way with fake snow,

then place the sparkly bits to your liking, 

and voila! A nice little table decoration! 

I made two and place the excess sparkly baubles in a nice glass jar.

Do you have a favorite Christmas DIY?

Tuesday, August 5, 2014

Flower Letter DIY

Hey lovely reader! Today's post is one I haven't done in a while, it's a DIY. A super simple yet cute project. I'm not gonna lie though, it can be a bit time consuming depending on how detailed you want it to be, so let's begin! 


All you need is a blank letter (the one I used was made of cork), silk flowers, and  a glue gun.

Next, take the silk flowers and cut the ends off, leaving a little stub that you will be able to place in the hot glue. 

Now the fun part! Take the flowers and go crazy, I personally didn't lay them out or anything, just went with the flow. Using your hot glue gun place the flowers however you like. 

And that's it! Like I said super simple, but I love how it turned out! 

Did you give this a go? I'd love to know! Xx

Sunday, March 2, 2014

Dried Flowers DIY

Hi there lovely reader! Today I thought I'd share a little DIY that I recently tried.


I love flowers! I think that they can really add something to a room. Not only do they look nice, but they smell nice too. We all know that they don't last forever, they wilt and die, and that's that. So, I wanted to try to dry out some flowers that I was given for my birthday. They were also the backdrop for my March quote. I will leave the link that I used to learn how to dry the flowers. It has a step by step guide and even little video loops.  You can take a look at that and I'll also tell you what I did. I didn't end up drying all the flowers because some of them were beginning to look bad. What I did do though was use the petals.


I picked the petals off of three or four of the flowers and placed them on a paper towel on a baking sheet. I then took the flowers that I was going to dry, and followed these steps. I let both the petals and the flowers dry for about a week. 


I sprinkled the petals in the bottom of a glass jar. Then I took the flowers and cut them down to size, I arranged them somewhat by color, the lighter and smaller ones on the bottom and the bright bigger flowers on top. 


Personally I really like how it turned out. It's simple and sweet looking. I definitely want to try drying flowers again this spring! Have you dried flowers before? Xx